Nettverks installasjon

Denne guiden forklarer hvordan en skal installere Widgit produkter på et nettverk. Produktene som er inkludert i denne guiden er listet nedenfor (Du har kanskje ikke lisens til å installere alle disse:
Widgit provide both exe bundle installers, and MSI packages for the above products. It is recommended that you use the exe bundle installers for standalone installations, and the MSI packages for network installations.
It is not recommended to use exe bundle installers for network installations, as they do not support automatic activation during installation, and cannot be wrapped in an MSI. The latest MSI packages can be downloaded from http://download.widgit.com/network/
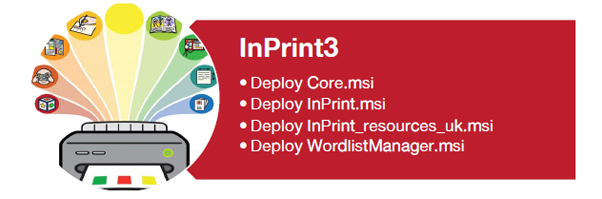
Products are split up into multiple MSI packages:
The Core components must be installed first. You can create an admin image from the Core package to configure how you want the suite of products set up. You can then select which additional packages you wish to install and deploy them without any additional configuration. They will inherit their configuration from the Core package.
The sequence of events for a successful deployment should be:

In order to perform a successful deployment, the installer requires three sets of information:
1. Folder locations
The installation allows you to configure the locations of certain application folders. These are:
The main program files, speech engines, and language databases. These are normally installed in the main “Program Files” folder unless you specify an alternate location. We strongly recommended that these files are installed on a local disk, not a network location.
Shared files are split into two categories.
“Shared Application Data” includes shared wordlists and spelling dictionaries which you may want to configure network-wide and enable for all users.
“Shared Documents” include templates, exercises, and example files that you may wish certain users to be able to edit but provide to all users. It is recommended that you store these on a network location.
User files include user-specific wordlists and the user's own documents. It is strongly recommended that you store these files in the user’s profile (the default behaviour) and use roaming profiles if you wish to enable access from multiple machines.
2. Settings
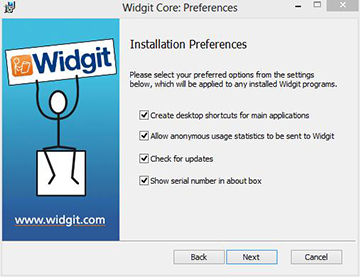
When enabled, this will create desktop shortcuts for all users.
When enabled, the program will occasionally send information on how it is used to Widgit. This information is for statistical purposes only and will be used to improve the quality of future versions of the software. It contains no personally identifying information.
When enabled, the program will check for updates on startup and prompt if a later version is available. This is disabled by default for network installations as most users will not have access to install the newer version.
When enabled, the program will show the licence key in the about box. This can assist with technical support, but is disabled by default for network installations.
3. Activation Settings
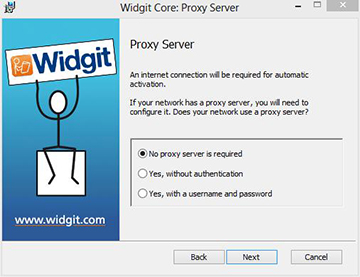
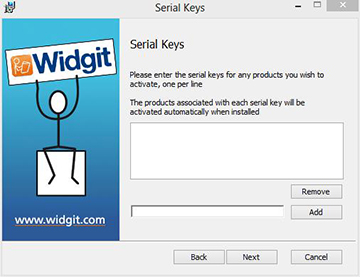
Several Widgit products require online activation before they can be used. Licence keys can be provided for individual products, product bundles, and language add-ons. You should provide all licence keys you wish to be activated on target machines as part of the admin install, and they will be activated when the package is deployed. You may also need to provide proxy server details in order for activation to work successfully, depending on your network.
|
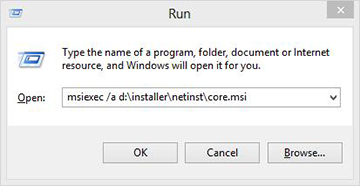
1. Insert the application CD. Go to 'Run' and enter: msiexec /a d:\installer\netinst\core.msi (If your CD-Rom drive has a different drive letter than D, make sure you type this instead.) |
|
|
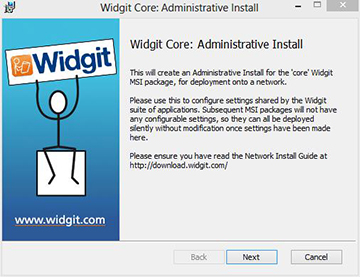
2. The administrative installation will then begin. Click ‘Next’ on this screen to continue. |
|
|
3. You will first be asked where you would like to create the admin package. The default location for this is in your ‘My Documents’ area. Note that if you would like your admin package available on a network location, it can be very slow if you enter a network path here. It will be much faster to create the admin package in the default location and then copy the files manually afterwards. Click ‘Next’ to continue |
|
|
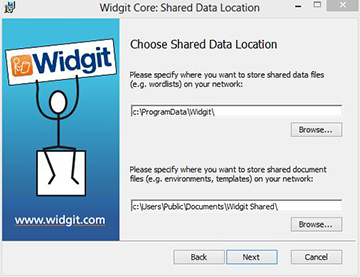
4. You will now be asked where you would like to install the Shared Files. These are files such as Wordlists, Templates, and Resource Packs which can be shared between all users. |
|
You have two options:
|
5. If you select the second option, you will be asked to specify locations for:
After selecting where you would like the Shared Files to be installed, click ‘Next’ to continue. |
|
|
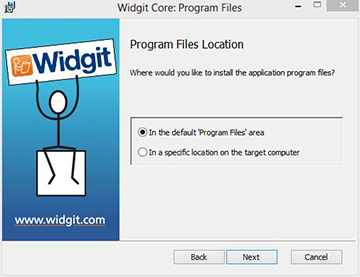
6. You can now choose where you would like the application program files installed. You have two options:
After selecting where you would like the application program files to be installed, click ‘Next’ to continue. |
|
|
7. You can now select the following installation preferences:
After making your selections, click ‘Next’ to continue. |
|
|
8. An internet connection will be required for automatic activation of some Widgit products. You may need to provide proxy server details in order for activation to work successfully, you have the opportunity to do so on this screen. After entering the information required, click ‘Next’ to continue. |
|
|
9. You can now enter the licence key of any product you wish to activate. The products associated with each licence key will be activated automatically when installed. After entering all licence keys, click ‘Next’ to continue. |
|
You have now entered all the information required to create an admin image. Click ‘Next’ to continue and begin the creation of the admin image, or click ‘back’ to make any changes.
An admin package will be created including an MSI and a large number of files. Note that if you want to copy or move these files to another location, you must copy the MSI and the additional folders together, keeping the relative paths the same.
You only need to create an admin package for the Core component. Other MSIs, such as inprint.msi, can be deployed as they are.
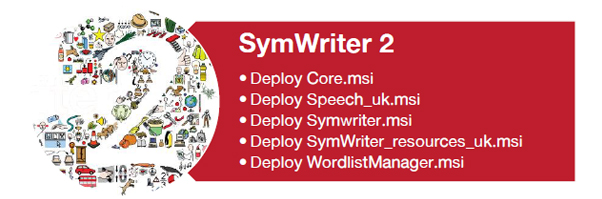
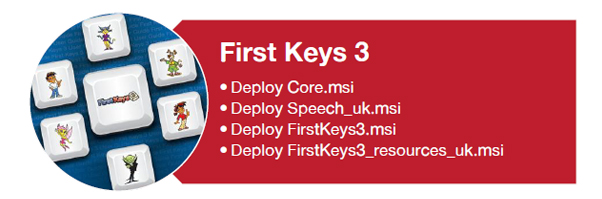
The most important thing to ensure is that the Core package is deployed before the additional packages. After the Core package is deployed, you can deploy the additional packages in any order, however we have included below some examples of the deployment process depending on what software you want to use.
Note: These installers require Windows Installer 4.5 in order to run. Deploying this on your network is outside the scope of this document, but should be done first.
Minimum systemkrav:
Operativsystem: Windows 8 eller nyere
Prosessor: 1 gigahertz (GHz) eller raskere
Minne (RAM): 1GB
Harddisk plass: 3GB
Skjermoppløsning: 1024×768
Anbefalte systemkrav:
Operativsystem: Windows 8 eller nyere
Prosessor: To kjerneprosessorer
Minne (RAM): 2GB
Harddisk plass: 3GB
Skjermoppløsning: 1920×1080 (1080p HD display)
If you are using Group Policy for deployment and would like help installing the software, please view the ‘Group Policy Deployment Guide’ in the documentation folder on the installation CD or download it from http://download.widgit.com/network/