Switching Between Colour and Monochrome Symbols
All Widgit Symbols can be displayed either in colour or monochrome.
|
|
Select the content you wish to change and click the Show in Colour button on the Edit tab to toggle symbol colour on and off. |

You can change the colours of symbols to personalise your vocabulary and make the document most appropriate for the end user. You can change:
All Widgit Symbols can be displayed either in colour or monochrome.
|
|
Select the content you wish to change and click the Show in Colour button on the Edit tab to toggle symbol colour on and off. |
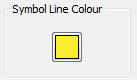
The line colour of all Widgit Symbols can be edited in much the same way text colour can. This is most useful to assist with visual impairment. When you change the line colour of a symbol the program will change the symbol to monochrome.
To edit the line colour, select the content that you want to edit and click the More Options button in the Font section of the Edit tab to show the Text and Symbol Formatting dialog.
|
|
Choose the Symbols Line Colour you would like to set as the line colour. You may want to change the frame background colour to give a good contrast with the symbol line colour. This can be especially useful for readers with a visual difficulty. |


|
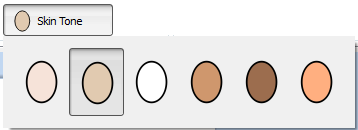
You can change the skin tone for any of the person symbols. Select the content you wish to change and press the the skin tone button on the Edit tab.
This will bring up a small box featuring all the possible skin tone options. To change the skin tone, click on the desired tone. |
|
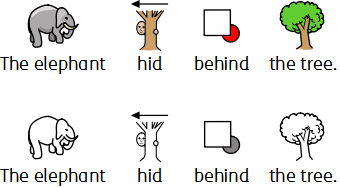
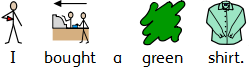
You can change the colours in a symbol in order to make it as specific as possible. For example, when making reference to a coloured item of clothing, such as a “green shirt” (see the example below), you will find that two differently coloured symbols may appear. Changing the colours in a symbol and editing the associated text can give greater clarity to the symbol reader.

Place the cursor in the word you wish to change and then select the Edit Colour button from the Edit tab.
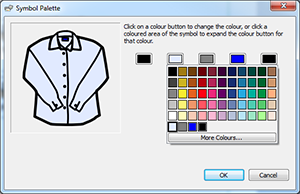
In the Edit Colour dialog box, you can click on specific parts of the symbol in the preview pane to select which colour to edit. Alternatively, you can click on the colour palette buttons.
> NOTE: You can also apply the same method for changing the colour of a Widgit media image or a symbol dropped in as a graphic.
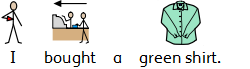
When you have finished editing the symbol, you can bring related words together under the new symbol. For this example, highlight the text “green shirt”. Then right-click on the new symbol and from context menu and select Set this symbol for the selected text.
|
|
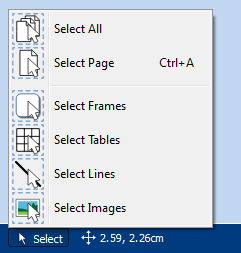
You can change the symbol colour mode, skin tones and line colour for all content within the document. Click Select on the Page Status Bar at the bottom of the screen, then choose Select All, Select Frames or Select Tables to focus the objects you want to change. Note: When you select objects over multiple pages, you cannot move or resize them. |